Lender Policy Details
This section will house all of the lenders for a file. Prior to selecting the first lender on the file, the section is rather barron. To get started, click on the orange ellipses button to open the Lender Selection window.
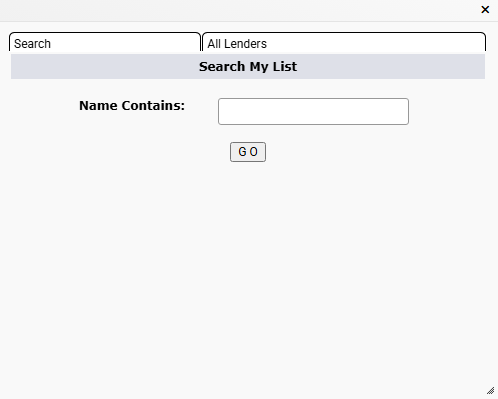
The window defaults to the "Search" tab. If selecting a lender used on a previous file, type in part of the lender's name and then click the "GO" button to reveal all of the previously used lenders.
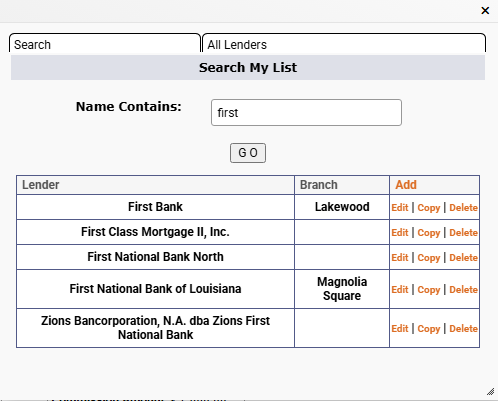
If the lender is located in the list, there are a few options available. The easiest is if no changes are needed for the lender, just click the lender's name (or anywhere on that row, other than the hyperlinks in the thrid column) and it will be automatically added to the Lender Policy Details section of EPIC. For each lender found, there is an option to "Edit", "Copy", and "Delete". "Add" at the top of the third column will appear on all search results, even if no lenders are found making it easier to quickly add a lender that is not currently in the EPIC user-specific databse.
The hyperlinked options are rather easy to understand. "Edit" will edit the existing entry and allow changes to be made to it. This will Edit the saved information for all future transactions but will not affect any current files where the lender was selected. It is recommended that the "Branch" be filled in to help identify multiple lenders. The "Branch" field is stored in EPIC, but not used in any documents generated in EPIC, so it is safe to put any information such as names, locations, or descriptions.
If it is necessary to create a duplicate lender due to address changes for different branches, loan processors, etc., click "Copy" to create a brand new entry of the same lender and only change the items that are needed. Enter info in the"Branch" field to make it easier to distinguish duplicate entries in the future.

Click "OK" when done. EPIC will automatically insert the information into the lender field and save the entry for future use. This is one of the few fields in EPIC that will auto-save entries for use in future files.
After the lender is selected, EPIC will populate the information into the Lender Policy Details section and additional fields will be added.
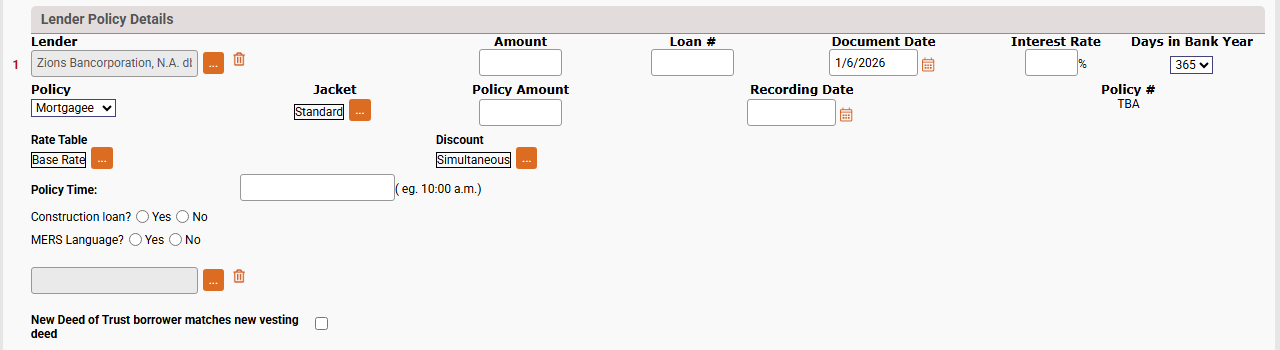
Lender fields
This field includes the lender name selected from the previous steps. To update this, click on the orange ellipses button. If it is necessary to delete the entry, click on the trashcan icon to the right of the ellipses button.
Amount
This should be the full amount of the loan issued for the policy. This is not the coverage amount that the rate is based on.
Loan #
This is not a required field. Update the field when the lender provides the loan number.
Document Date
This date auto-populates from the closing date. Only change this field if the security instrument will be signed outside of the closing date.
Interest Rate
Enter the interest rate provided by the lender. This will assist in populating amounts on the Closing Disclosure / HUD for you.
Days in Bank Year
Select how the bank calculates the interest rate. EPIC defaults to 365 days, the most common; however, 360 may also be selected. This also aids in calculating pro-rated fields on the Closing Disclosure / HUD.
Policy
EPIC defaults to "Mortgagee"; however, if doing a split closing or in the rate case the lender policy will not be issued, change this to "Not Insured". This will ensure a policy is not generated, nor a rate generated.
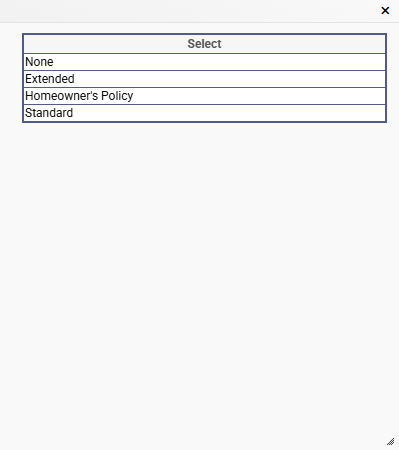
Jacket
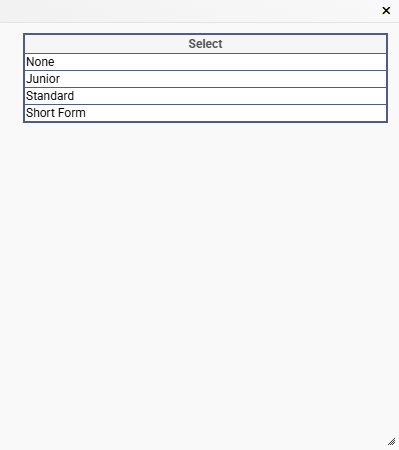
This field will default to one of the jacket values available, based on the state. In most cases it will default to "Standard" in others it may default to "Extended". To change, click the orange ellipses button to the right of the field to open the selection window. Options can include, based on the transaction type, "None", "Junior", "Standard", "Short Form", or "TSG".
Policy Amount
This field auto-populates based on the Amount field. If the amount of coverage is different from the loan amount entered into the Amount field change it here. The most common reason to update this field is when handling a reverse mortgage.
Recording Date
Enter the date the security instrument was recorded by the county. If typing the date instead of selecting from the calendar, enter as 1/1/2026 or 01/01/2026. Entering less than the four-digit year will generate an error message and erase the inforamtion entered.
Policy #
This field is not editable and will only display a policy number once one is issued. Policy numbers are issued once the polciy is generated for the file, until then, the field will display TBA.
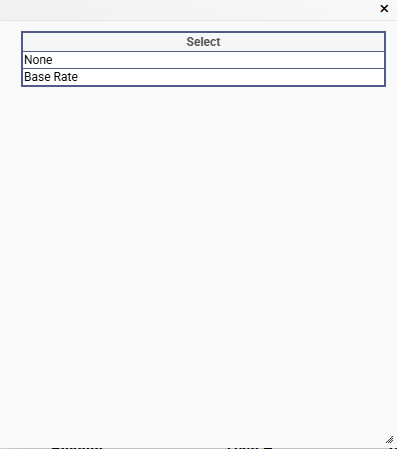
Rate Table
This field will default to the "Base Rate" on purchase files, but may change to a refinance rate table for Refinance files if it is a rate filed in that state.
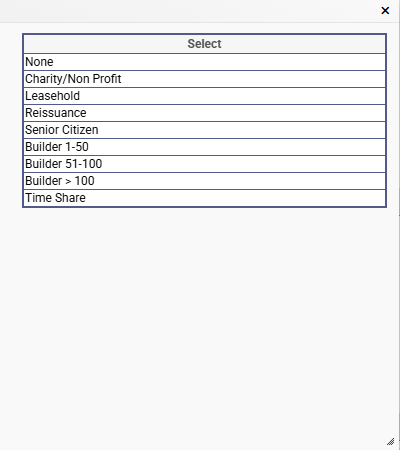
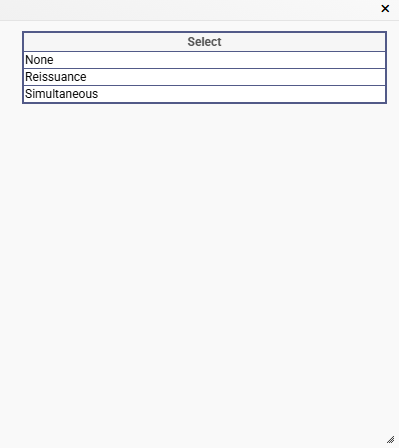
Discount
This field indicates the discount off of the selected rate table. In most cases, when a lender is added to a pruchase transaction file, the discount defaults to simultaneous and on refinance files, it will default to refinance. To change, click the orange ellipses button to the right of the field.
EPIC will display the available options for the state.
Policy Time
Enter the time the security instrument was recorded. This inforamtion is located in the recording info at the top of the recorded security instrument from the county.
Construction Loan?
This option is not shown for all states; if it is showing on the screen, please indicate if the loan is a construction loan or not. Do not leave it blank.
MERS Language?
This is another option that may not be availabe in all states. Selecting this will change how the lender information is shown in the recording information on Scheule A Item 4 as well as Schedule B Section I and II (for second and third mortgages).
New Lender Field
This blank, unlabled field is reserved for another lender, if needed. To add, click the orange ellipses button to the right of the field and chose the lender. Review the information in the lender field above as it works exactly the same. When a new lender is selected, it populates all of the same fields as the prevous section does, with one added button and a check box. All of the other fields work exactly the same as above.

The new fields "2010 HUD" and the button labeled "HUD 2015" allow you to access the documents necessary to itemize fees, etc. that will be deducted from the second loan prior to adding the remainder to the first mortgage's Closing Disclosure/HUD. Checking the box "2010 HUD?" will change the button to "HUD 2010" instead of the Closing Disclosure, which is available under the HUD 2015 button that shows with the "2010 HUD?" check box is not checked.
EPIC will continue to generate a new blank lender after entering the new lender. This keeps the screen uncluttered when not in use, but allows you to add as many lenders as needed. The new blank lender entry will always appear directly above the "New Deed of Trust borrower matches new vesting deed" confirmation check box.
New Deed of Trust borrower matches new vesting deed
A policy cannot be issued unless this box is checked (EPIC does not require the field to be checked to issue a commitment). Once the security instrument(s) are prepeared, verify that the vesting information for the new owner (current owner for refinances) matches how the parties are going to be listed or already listed on the recorded deed. This is another way that EPIC helps you keep all fo the i's dotted and t's crossed.
Additional Party Info
Listing/Seller Agent
This section houses the information for the seller's agent and captures the party's compensation for the transaction. Use the "enter/edit" button to add a new agent to the file or the ellipses button to select an existing agent. Enter the % of the sale the agent has agreed to in the first field and EPIC will automatically calculate the amount, or the flat compensation amount in the second box.
The fields in this section do not automatically save the data entered. If you want to create a list of agents within EPIC, when adding a party, always click the "Update List" button prior to clicking OK. This will save the party to the specific list entered. These lists are not shared between any of the other parties. If a real estate agent is representing seller on one file and then a buyer on another, they will need to be entered once for each section, but once entered and saved, they will always be available for selection in the future.
Selling/Buyer's Agent
This section houses the information for the buyer's agent and captures the party's compensation for the transaction. Use the "enter/edit" button to add a new agent to the file or the ellipses button to select an existing agent. Enter the % of the sale the agent has agreed to in the first field and EPIC will automatically calculate the amount, or the flat compensation amount in the second box.
The fields in this section do not automatically save the data entered. If you want to create a list of agents within EPIC, when adding a party, always click the "Update List" button prior to clicking OK. This will save the party to the specific list entered. These lists are not shared between any of the other parties. If a real estate agent is representing seller on one file and then a buyer on another, they will need to be entered once for each section, but once entered and saved, they will always be available for selection in the future.
Mortgage Broker
If the borrower used a mortgage broker, enter their contact information in this field.
The fields in this section do not automatically save the data entered. If you want to create a list of agents within EPIC, when adding a party, always click the "Update List" button prior to clicking OK. This will save the party to the specific list entered. These lists are not shared between any of the other parties. If a real estate agent is representing seller on one file and then a buyer on another, they will need to be entered once for each section, but once entered and saved, they will always be available for selection in the future.
Other Side's Attorney/Title Agent
Enter the attorney or title agent information for the other side of the transaction. This is most common in Utah where split closings are commonly handled.
The fields in this section do not automatically save the data entered. If you want to create a list of agents within EPIC, when adding a party, always click the "Update List" button prior to clicking OK. This will save the party to the specific list entered. These lists are not shared between any of the other parties. If a real estate agent is representing seller on one file and then a buyer on another, they will need to be entered once for each section, but once entered and saved, they will always be available for selection in the future.
Other Side's Attorney Attorney
Enter attorney information in this field if needed.
The fields in this section do not automatically save the data entered. If you want to create a list of agents within EPIC, when adding a party, always click the "Update List" button prior to clicking OK. This will save the party to the specific list entered. These lists are not shared between any of the other parties. If a real estate agent is representing seller on one file and then a buyer on another, they will need to be entered once for each section, but once entered and saved, they will always be available for selection in the future.