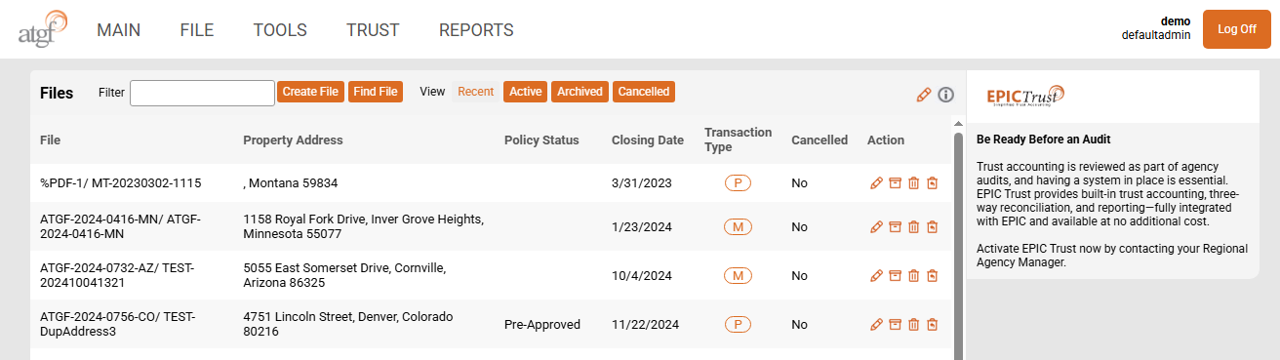
Upon successful login, EPIC loads the "Main" screen presenting either the "Recent" or "Active" views.
The "Recent" view displays the 20 most recently accessed files helping to reduce the need for searching. The "Active" view will display all of your files. The "Archived" view shows only files that have been archived and the "Cancelled" view shows only the files that have been marked as cancelled.
This will always navigate you back to the main screen.
Create New File Delete Copy Existing File Find a File Save Access Old EPIC
Create New File
Launches the New File Setup Screen.
Delete
This allows you to delete a file that has not had a policy issued. Once a policy is issued, you will no longer be able to delete it.
This option is not available if you are not in a file. From the main screen "Delete" does not show as a drop-down option.
It is not recommended that you use this feature. It is better to mark the file as cancelled than to delete and lose all of the work put into the file that may prove useful later on down the road.
Copy Existing File
Launches a new screen that will enable you to select a file from specific views in EPIC to copy. You can copy hyperlinked commitments as well by checking the box "Would you like to copy Hyperlink documents ?" Your documents will be carried over; however, you will still need to order the hyperlinked commitment and agree to the fee after setting up the file to have access to the documents.
Find a File
Clicking this option will return EPIC to the Main screen; however, it will also launch the find file pop-up.
You can search by "File Name", "File Number", "Purchaser/Borrower Name", and "Property Address".
You can use one or all of the fields in conjucntion to search.
Save
Saves the file that you are currently working on.
Similar to "Delete" this option is not shown in the drop-down unless inside of a file.
Access old EPIC
This will automatically open a new tab and launch the old EPIC login screen.
This is option is only accessbile by those who have used old EPIC. Users set up in our system after January 2024 are not in old EPIC and will not have access.
Firm Settings Calendar Preferences Export to IRS Contact Us EPIC User Manual Agent Remittance Report
Firm Settings
This allows you to update account specific information. A user clicking on this link will only be able to update the user password; whereas, admin logins will be able to udpate more informaiton related to the organization.
Calenedar Preferences
This is where the preferences for the calendar are set up. The calendar can only be access from within a file. Update how dates to track on the calendar, remove those that do not align with the organizational processes.
Export to IRS
This launches the screen where informiaton is reviewed prior to exporting to the IRS. This relates directly to the 1099S process.
Contact Us
This loads a page with all of ATGF contact information as well as a link to the website.
EPIC User Manual
This link will direct you to the EPIC User Manual in pdf format.
Agent Remittance Report
Lists files where policies were issued. Each group of policies are specific to the month shown above them. Use this to select the files that need to be paid, print, and mail with payment.
ATGF does offer an ACH option eliminated the time and expense to print and mail payment directly. Contact a regional agency manager for more information on the program.
Reconcile Payables Reports Trust Accounts
Reconcile
Opens the Reconciliation Dashboard.
Payables
Opens the check printing screen. Select the account and ledge (if desired) to begin.
Reports
Access reports specific to the trust account. Select the trust account as the subject for the reports and then select the time-frame and report type needed.
Trust Accounts
This lists all of the trust accounts currently linked to EPIC Trust. If you need to add a new trust account, reach out to the regional agency manager for your area or underwriting as these accounts will be setup for you through IT.
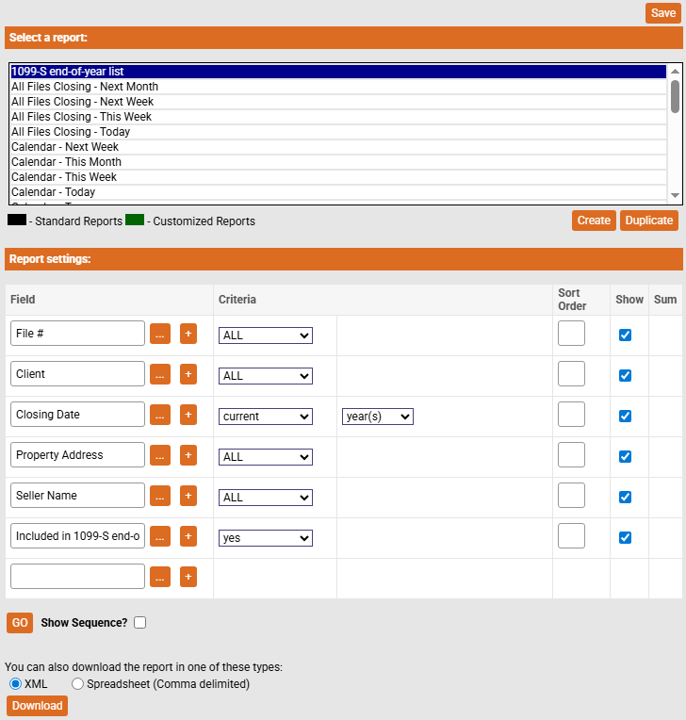
This will take you to the reports screen. The reports housed here are specific to the files that have been set up. If trust accounting reports are needed, go to the "TRUST" menu option and select "Reports" from the drop-down there.
Once the "REPORTS" menu is selected, a new page will load that shows all fo the pre-loaded reports available.