CLOSING DISCLOSURE/DISBURSEMENT TAB

Settlement Statements

EPIC has three settlement statement options available. They can be chosen when creating a new file (as shown above) or can be switched between the 2010 HUD and 2015 Closing Disclosure on an existing file. When setting up a new file, click the drop down by the "Use HUD?" question.
  • 2015
    This is the 2015 TRID Closing Disclosure and is the default option for EPIC.
  • 2010
    This is the 2010 HUD-1 Settlement Statement. It is not used as often except for revrese mortgages, cash transactions, commercial deals, hard money lenders, and manufactured homes.
  • old hud
    This is the 1986 HUD-1 Settlement Statement. It is rarely requested. Like the 2010 HUD, the 1986 HUD, in the rare instances that it is requested, is usually for cash transactions, commerical deals, hard money lenders, or investors. Those requesting it usually do so because of their existing systemsThis can only be setup at the time the file is created. After the file is setup, it cannot be switched to this type of settlement statement; however, after selecting, the file can be changed to either the 2015 Closing Disclosure or the 2010 HUD-1 (keep in mind,once changed from the old hud to one of the other two options, EPIC cannot be changed back).
When in an existing file, EPIC allows the type of settlement statement to be selected from the GEN INFO tab. The option will allow the change between the 2010 HUD-1 Settlement Statement and the 2015 Closing Disclosure only.

It is important to note that at any point that the type of settlement statement is changed, EPIC will clear any manually entered data prior to swithching to the newly selected settlement statement requiring that the data be re-entered.

"old hud" (1986 HUD-1 Settlement Statement)

Once the old hud option is selected and the new file ccreated, there will be two buttons "Swithce to 2015 Closing Disclosure" and the "Switch to 2010 HUD". Before clicking either of these two options, remember that EPIC will switch from the old hud selected on the file creation screen and will not offer the option to go back after confirmation. Make sure that the parties do want the file changed. Otherwise, the only option is to create a new file to get the old hud back. Click on the "CLOSING DISCLOSURE/DISBURSEMENT" tab to review the fields
The first option shown is the "Print" drop down. Chose to print the full HUD, Borrower only, or Seller only. After selecting, click the "Create Document - HUD" button to generate and download the form.

"Include HUD in Disbursements"
Unchecking this box will prevent any items entered from appearing on the disbursement tab. Clicking "Rebuild Disbursements" will remove everything from the Disbursements tab.

"Expand/Collapse" 
In the screenshot above, there are two expand/collapse icons. One for the full HUD statement. When the arrow is pointed down, it indivcates the section is expanded (or in the case of the Full HUD Statement option, it means the entire entry form is expanded). Clicking the icon will collapse that section (or entire form).

HUD - General Info

Most of the information in this section is copied from the GEN INFO tab of EPIC. If information is missing here, it is probably missing from the GEN INFO tab. When possible, enter the information there instead of overwriting it here.

HUD - Item J Summary of Borrowers Transaction and
Item K Summary of Sellers Transaction

This section documents the borrower and seller transaction. Borrower on the left, seller on the right. ATGF strives to mimic these forms as much as possible. You will notice that the form is setup to follow the same flow as the final document for ease of entry.

In many of the fields, there is a "C" box that will open a calcuation window for you.These vary based on the field.
For the tax field, clicking the "C" box will open the window defaulting on "Prior Years Tax" with the option to change to the "Most Current Assessment". Select the option and fill in the information. EPIC will calculate the amoutn due based on the start and end dates shown in the fields shown on link J.211.
These "C" boxes shown on lines where a date range is not present, provide either calculation support for date ranges within the C box or change the type from "Date Range" to one of the other 4 options; Oil, Water, Sewer, or General. Click each option below to explore them further.
This could be used for home heating oil. Disclosing the total gallons remaining, cost per gallon, and the EPICcalculation will show in the "Result" field.
Similar to Oil, except calculated in total days and cost per day. EPIC will automatically calculate the amount in the "Result" field.
Sewer operates exactly the same as the Water type. Enter the total days and cost per day and EPIC will do the math and populate the product in the Result field.
This option works like a combination of the other fields. When you select "General" you have the option to enter a description of the charge, the quantity and then you can select the unit type. EPIC allows you to select Quarts, Gallons, Weeks, Days, Months, or Years. Enter the cost per unit and EPIC will calculate the cost in the "Result" field.
The date range has a few additional calculations that are performed by EPIC for you. Here, you will enter the Name of the bill to reimburse the seller. Enter the first day in the billing cycle and then the last day (normally the day of closing). Next, enter the total number of days in the billing period, this is the first day of the billing cycle to the last day of the cycle (28, 29, 30, or 31 usually). Finally, enter in the total amount of the bill. EPIC will calculate the per diem amount based on the Bill amount entered divided by the total number of days in the billing period field. EPIC will then calculate the total days between the from and to date and multiply that against the per diem rate to show the final calculation in the Result field.
The other is the "P" box. You will see this box freqently in this section. It changes how EPIC handles the amounts for the specified line. Clicking "P" will update the item from being due at closing to being marked as "P.O.C" or "Paid Outside of Closing". When clicked, the view of the item will change to show P.O.C.

HUD - Item L Settlement Charges

Item L includes lines 700 through 1400. Click on the tabs below to explore each section.

700. TOTAL SALES/BROKER'S COMMISSION:

This section focuses on the sales/broker commissions. Enter the percentage of the commission in line 701 and/or 702. Then enter the party recieving the funds in the 'to' field.
On line 703, leave blank or add any additional clarifying information this will show up on the old HUD next to "Commission paid at settlement", below is a screenshot from the 1986 HUD-1.
Lines 704 and 705 use the "P" box to calculate. Click the "P" to open the window.
This is  "P" box differs from the one in section J line 109-112 as that changed the item to P.O.C. (Paid outside of Closing). This "P" box allows you to update payment information. In the first field, enter the amount to be paid in either the Borrower or Seller fields (or split between the two if the parites agreed to a split of the amount). If the payment is to be disbursed, contine to the "Memo" line and enter a brief description of the fee; otherwise, click the drop down to the right of the fee andchose to either deduct from or include in the loan amount. When that field is changed, EPIC will automatically uncheck the Disburse box. The memo field has the orange ellipses button that stores any previously saved memo information. In most cases, there will not be any information shown.
In the "To" box, you can type in the vendor information, or select from a pre-formatted list, see below for the default view:
Each of these link to pre-completed information already in EPIC. ATGF refers to Attorneys Title Guaranty Fund, Inc, the underwriter. The rest are as follows:
MORTGAGE BROKER is pulled for the  corresponding field at the bottom of the GEN INFO tab.
COUNTY will enter the name of the countly entered in the Property Details window on the GEN INFO tab.
LENDER 1*, LENDER 2*, and LENDER 3* will reference the first three lenders entered on the GEN INFO tab,
LISTING AGENT and SELLING AGENT are also entered on the GEN INFO tab just above the Mortgage Broker field.
SETTLEMENT AGENT is pulled from the GEN INFO tab at the top of the screen.
TITLE COMPANY is your information that ATGF has loaded as part of your agency's profile.
These are all quick click actions, but are not required, if preferred, the name of the party can still be manually typed instead.

As the box is completed, EPIC will automatically calculate the Disburse Total, Total Deduct, and Total include amounts. To document items that are P.O.C. enter the amounts for the appropriate party in the section "Paid Outside of Closing". The dropdown fields and "Disburse?" checkboxes work the same as they do in the upper portion of the window.

Finally, when complete, click the "Close" button, do not click the "X" to close the window as it may cause EPIC not to save the information.

800. ITEMS PAYABLE IN CONNECTION WITH LOAN:

The 800 series line items are reserved for loan fees including the origination fees, document fees,etc. Line 801 has both a percentage for the origination fee as well as a to field. It isrecommended to enter the percentage amount and then click the "P" box. This allows EPIC to calculate the amount and place in the borrower field within the P box, from there "Deduct from loan" can be selected as it is rare this fee is disbursed. All of the P boxes work the same as described in the 700's tab for lines 704 and 705.

900. ITEMS REQUIRED BY LENDER TO BE PAID IN ADVANCE:

This section is for advance payments. EPIC will automatically calculate line 901 if the interest rate is included on the GEN INFO tab for the lender, if not, this can be manually entered. In some cases, this may need to be adjusted. EPIC will automatically calculate from the date of the closing to the first of the following month.
In the example above, EPIC calculated for one day of interest. The lender needs this to the first of the August. So, we adjust EPIC by either typing in the date or clicking the calendar and selected the date for prepaid interest.
Once we update the to date field and acknowledge the overwrite confirmation pop-up, EPIC will recalculate the interest, based on the per diem amount.

For lines 903 and 904, the lender may not require the borrower to pay Mortgage Insurace or Hazard Insurance, or it may be included in the loan and not paid as a separate line item.

Lines 904 and 905 are available for any additional items required by the lender.

1000. RESERVES DEPOSITED WITH LENDER:

This section is the Escrow account, also referred to as an impound account. These are amounts collected by the lender and held to pay the borrower taxes and/or insurance and can include HOA dues as well. Complete this as you did for the 900's and use the P box to mark items as deduct from loan.

Lines 1008 and 1009 are collapsed until the Aggregate Accounting Adjustment line is selected. Choose one of the two lines and indicate if it should be displayed as a negative number or not. The box is checked by default. Use this field only if the combined items in lines 1001 - 1006 exceed the RESPA limit, the aggregate adjustment will be used to bring to overall total down to that limit.

1100. TITLE CHARGES:

This section is reserved for the fees related to researching and preparing the file for a title policy, including the lender policy, owner policy, and endorsement premiums. Premiums are automatically calcualted by EPIC, just enter any of the fees being passed on to the client.
The P boxes act the same as in previous sections, they are not used specifically to change items to a P.O.C. status with one click. To change that, you will need to make the manual adjustments within the P box.
The "Calculate Premium" button, when clicked, will open the Premium Calculator.
This is used primarily when rates are refiled. Enter the date that the original quote was provided to force EPIC to use the prior rates and not the newly filed rates. Click "Calculate" when done to ensure that EPIC pulls in and bills the correct premium.
In some situations, ATGF may authorize an override of the premium. If so, enter the amount of the correct premium in either the OP Premium or MP Premium fields. EPIC will ask for a confirmation of the overwrite and then calculate the correct premiums and update the settlement statement. If something fails to update, click the "Calculate" button to force EPIC to recalculate.

1200. GOVERNMENT RECORDING AND TRANSFER CHARGES:

The section covers government related charges from recording fees to tax stamps for the city, county, and state and any release fees. One additional field is provided for any fees not shown. This section offers up some new boxes that have not been covered before.
C Box - The C box appears on lines 1201 and 1204 and is used as a calculator for the specified documents.
The first C box is the recording fee calculator. Enter the total pages of each deed recorded and each Mortgage (Deed of Trust/Security Instrument) being recorded. EPIC calculates the recording fees based on the page total. In areas where counties have moved to flat fees, this feature will not work. If not, enter the total amounts for all deeds in the firstDeedboxonline 1201 and repeat the process for the Mortgage box. Click the "P" box to set the payee to the county.

The second C box calculates the recording fees for the release of any prior lien. Enter the pages for each item recorded to have EPIC calculate to total recording fee or enter the total amount in the field under the Borrower or Seller column on line 1204.

The next two boxes that are new are the "S" and the "B" box. These boxes allow you to move the fee from the Borrower "B" to the Seller "S".

All of the "P" boxes work as previously discussed.

1300. ADDITIONAL SETTLEMENT CHARGES:

In this section, use the "P" box to enter amounts, memos, and payee information for any additional settlement charges.

1400. TOTAL SETTLEMENT CHARGES:

This section automatically calculates all fo the informaiton from section J and K for both the borrower and seller. Verifiy the calculations are correct before proceedign to the next section of the 1986 HUD-1 Settlement Statement "Continuation Page".

HUD - Continuation Page

This section allows for additional entries for the 800 series from 811 to 831 for any additional items payable in connection with the loan aswellassection1300 series from 1307 to 1327. Use the "P" box to enter amounts, memos, and payee information, as well as indicate if these items are included in the loan, deducted from the loan, or disbursed.

"2010" HUD-1 Settlement Statement

When the 2010 HUD is selected, the Closing Disclosure screen will appear as it does above.

The GEN INFO tab will show the button "Swtich to 2015 Closing Disclosure". Remember, clicking this button will erase all of the data previously entered into the current settlement statement selection and will need to be re-entered after clicking the button and acknowledging the two warning messages.
This HUD is setup very similar to the "old hud" from the previous tab with only a few changes.

The first section contains the print options and the second section contains loan and transaction information.
The second section contains the Summary of Borrower/Seller Transactions (J & K).
Each of these sections are grouped by according to the information contained within each.

Section 1

  • Print:
    Select how the settlement statement should print; "Full HUD", "Seller Only", or "Borrower Only".
  • Create Document - HUD
    This is the print button used to generate the HUD-1 Settlement Statement based on the previous selection.
  • Include HUD in Disbursements
    This box is checked by default. Leave this box checked unless you are not using EPIC to disburse the file AND not sending the disbursemetns to QuickBooks Online.
  • Print Singature Lines on HUD
    Check this box if you want the HUD-1 Settlement Statement to include a signature line for each of the parties
  • Estimate / Final
    Check the box or boxes that apply to the version of the HUD-1 Settlement Statement to be printed.
  • Two page HUD
    Check this box if you wish to print a 2-page HUD.
  • Type of Loan
    In most cases, the Lender's HUD-1 Settlement statement will be used to copy into EPIC. Select the loan type as shown on the lender's document; FHA, RHS, Conv. Unins., VA, or Conv. Ins. As always, if there are any questions, always reach out to the lender to find out the loan type, especially if there appears to be a conflict in information.
  • File Number
    This will auto-populate based on the File Number entered in the File Number field located on the GEN INFO tab.
  • Loan Number
    This field will auto-populate with the loan number for the lender that was entered on the GEN INFO tab.
  • Mortgage Insurance Case Number:
    Enter the number, if applicable, which would be provided by the lender in this field. If there is no Mortgage Inusance, then this field will be blank.
  • Note:
    This is a hard coded note that willshow on the final document.
  • Name and Address of Borrower:
    This section will auto-populate based on the information entered for the Borrower on the GEN INFO tab. Any missing information is likely due to the same information being missing or mis-entered.
  • Name and Address of Seller
    This section only appears are files set up as purchases, not refinances. Similar to the prior field, it is auto-populated by information entered on the GEN INFO tab. If information needs to be corrected, please do so on the GEN INFO tab to ensure that it also corrects any other documents tha tyou may be using elsewhere in EPIC.
  • Name and Address of Lender:
    This information is pulled from the lender screen. Again, this information is filled out on the GEN INFO tab un the Lender Policy Details. To update, go to GEN INFO screen, click the ellipses button to the right of the lender. Locate the lender either by searching in the search box or scrolling the full list of lenders. Click "Edit" to open the screen.
  • Property Location:
    This informaiton is also pulled from the GEN INFO screen. Anything that is incorrect in this field should be udeted in the Property Details window located on the GEN INFO tab in the Commitment Details section.
  • Settlement Agent:
    This information is pulled from the GEN INFO tab and is normally filled out with the user's information. Ifnot, update the informaiton from the GEN INFO tab, just ablove the Commtiemnt Details section. Click the ellipses button to the right of the Settlement Agent field to access the editable data screen.
  • Settlement Date:
    This is the closing date. Update this from the GEN INFO tab.
  • Place of Settlement:
    This is the address that is located in the Settlement Agent window. Update that information at the same time as updating the Settlement Agent above.
  • Disbursmeent Date:
    This field is also pulled form the GEN INFO screen. The fieldion the GEN INFO screen auto-fills based on the file type. For purchases, it is set to the same day, for a refinance, it is set to 3 business days after the settlement date. If needed, update this field on the GEN INFO tab.

Section 2

J. Summary of Borrower's Transaction & K. Summary of Seller's Transaction

This section contains all of the funds expected in and going out for the file as well as fees, taxes, escrow, etc. Each of these sections are separated out in individual groups. These groups are covered below.

100. Gross Amount Due from Borrower & 400. Gross Amount Due to Seller

Working in column J, enter any information that needs to be added. Line 100 and 103 are auto-filled; line100 indicates the purchase price from the GEN INFO tab and line 103 contains the settlement charges from line 1400. Lines 106-112 are reserved for items that the seller paid in advance and will be reimbursed. Items in rows 106-112 will auto-fill on the Seller's side as they are completed.
Lines 102 & 103 on the Borrower Side and lines 404 & 405 are reserved for loan payoffs.
If needed, click the orange "Add" buttons to add additional lines to the indicated sections.

EPIC also has specialty buttons listed. There are two types of C Boxes in this section and a P Box.
Lines 4 and 5 in both the 100 and 400 series are used to calculate payoffs of existing loans. Click C Box - 1 below to learn more.

The second C Box is for the tax calculator. Click C Box -2 below to learn more. Finally, the last button is the P box. Click it to change from Pay at Closing to Paid Outside of Closing. Click the P Box button below to see more.

200. Amounts Paid by or in Behalf of Borrower / 500. Reductions in Amount Due to Seller

In this section, line 202 will populate the total principal of the new loan for the borrower and any settlement charges for the seller. The rest is entered as amounts that should be paid by the seller. Line 211 will be the most common as taxes are most often paid in arrears. When you click the C box for the county taxes, the window will populated with "Select" instead. Click on "C Box - 2" below for more information.

The next C Box that we come across appears on lines 13-19 for this section. Click the button "C Box - 3" for more information.
Similar to the last section, the P Box will toggle the specific line to P.O.C. (Paid Outside Closing). Click the P Box - 1 button below for more info.

300. Cash at Settlement from/to Borrower & 600. Cash at Settlement to/from Seller

All items within this section are automatically calculated. If it is ever necessary to overwrite these files, please reach out to ATGF as soon as possible to see if programmers need to fix an error.

L. Settlement Charges

Section L begins with the 700 series items. The first button we come across is the "Clear Commission" button. This will delete information entered into lines 701 and 702. The field to the right of this button auto fills from the "Paid From" field from row 703 and is auto-calculated based on informaiton entered into rows 701 and 702.

The P Box shown for row 704 is your data entry point for this row. Click the P Box - 2 button below for instructions.

The last box is the "Add 700 Continuation Section" button. Click this button to add 5 more rows to this section.

800. Items Payable in Connection with Loan

This section houses the 800 series items and includes information related to the loan. When available, always use the P Boxes to enter the information. In this section, we have a new P Box to review. Click on the P Box - 3 below for more information.

The next button that we have in this section is the G box. This is for the Good Faith Estimate. Click the G Box button below for more information.

The last button for this section allows for the expansion of the section from 808 up to line 820.

900. Items Required by Lender to be Paid in Advance

This section contains the items that the lender requires to be paid in advance. The P box is the first that we come across. Click the P Box - 3 button below for information on filling out that calculator.

Fro the G Box, click on the G Box button below for more information.

1000. Reserves Deposited with Lender

This section is used to enter amounts to fund the beginning of the borrower's impound/escrow account. Enter the amounts that will be held in impound to be paid on behalf of the borrower annually. This amount will normally be 2 months of payments. The lender should provide an escrow analysis statement that will indicate the amount to be held. The aggregate adjustment is used to remove any exccess amounts that may come up in the base calculations.

In this series, we have a P Box used for updating each row. Before filling out the P Box, start by putting in the number of months and the per mount amount. This way, most of th einformation will already be present, all that needs to be selected is the payee and if the amounts are deducted from/Included in the loan or disbursed. Click the P Box - 3 button below for more information.

The last button on this screen is "Add 1000 Continuation Section" which, when clicked, will add lines 106-a, 106-b, and 106-c belowline 106.

1100. Title Charges

Most of this section is auto completed based on the title insurance premiums. In this section, there are multiple types of screens that can appear for the P Box. Click on P BOX - 2 and P BOX - 3 below for more information. There are two G Boxes as well. Click on the G Box button below for more information.

Finally, to get rows 1109 through 1120 to appear, click on the button "Add 1100 Continuation Section".

1200. Government Recording and Transfer Charges

This section is reserved for the government fees. Enter the amounts for each type of recorded document. The deed, Mortgage/Deed of Trust, and finally the amounts for all releases that need to be recorded. To change the responsible parties, use the B and S box to toggle between S and B. This changes the party responsible for the charge; B for Borrower and S for Seller. These options do not appear on refinance files.

Once all the amounts are entered, use the P box to enter the payee information. Click the P Box - 2 button below for more information.

Finally, clicking the button "Add 1200 Continuation Section" will add rows 1207 - 1220 allowing for additional governmernt fee entries.

1300. Additional Settlement Charges

This section will contain all of the remaining settlement charges not documented elsewhere on the HUD. This section contains the G and P Boxes. Click on the G Box below for more information on it and P Box - 3 and P Box - 2 respectively to review how to use them for the last rows.

As common to most of section, there is another button "Add 1300 Continuation Section". Click this if additional amounts need to be added that are not coveredelsewehre within the settlement statement. This will enable entries up to row 1330, which should be more than enough to finish out the HUD.

1400. Total Settlement Charges (enter on lines 103, Section J and 502, Section K)

This final row of the HUD-1 Settlement Statement, appearing just under the 1300 series, is an auto-calculation of all the settlement charges previously entered and directly feeds these calculations into rows J.103 and K.502 located at the very top of the page.

Comparison of Good Faith Estimate (GFE) and HUD-1 Charges

When reviewing this section make sure that these amounts match exactly to what the lender has provided. Update the G Boxes in the previous section to complete this section.

Loan Terms

Using the information provided by the lender, fill in the information here to complete the loan terms.

NOTE:
This section can be completed directly from the keyboard using the Tab key to navigate from field to field and the Space Bar to check/uncheck a box.

C Box - Mortgage Payoff Calculator

Click the ellipses button to open the lender list. The lender can be searched or selected from the list of "All Lenders". If not present after a search or looking through the existing list of saved lender, click the "Add" link to add them. Follow the same steps as shown when adding a lender on the GEN INFO Tab.
Once added, the lender will automatically save to the existing list and can be used in future files here as well as on the GEN INFO tab's lender list.

One the linder is selected, enter the Loan Number, the Unpaid Principal Balance, the Statement Date (listed on the Pay Off Quote), Expected payoff Date, per diem, and any other fees. EPIC will calculate the interest amount as well as the Total Payoff Amount by adding the Principal amount, intereste calculation and fee amounts.

Click OK and EPIC will add to the settlement statement on both the borrower and seller's side.

C Box - Tax Calculator

The default view for this type of calculation box is the Date Range. It shows the from date as the date of closing and the To Date as the last day of the year. Enter the total number of days in the billing period (usually 365 for a full year of taxes), then the total amount billed. EPIC will calculate the total that should be credited back to the seller in the Tax Amount field. Click Close to have EPIC show a debit on the borrower side and a credit back to the seller on the seller side.

Alternatively, you can enter the data for the most recent assessment. Enter the amount that the land and improvements were assessed in the appropriate fields and then the amount of the Mill Levy. EPIC will calculate the rest for you. Click Close to have EPIC show a debit on the borrower side and a credit back to the seller on the seller side.

Alternatively, you can enter the data for the most recent assessment. Enter the amount that the land and improvements were assessed in the appropriate fields and then the amount of the Mill Levy. EPIC will calculate the rest for you.

The final option is the Prior Years Tax. You can use this field and enter in the full tax bill for either the prior year or if available, the current year. EPIC will calculate the same way as Date Range and Most Current Assessment.

C Box - Miscellaneous Items

These "C" boxes provide either calculation support for date ranges within the C box or change the type from "Date Range" to one of the other 4 options; Oil, Water, Sewer, or General. Click each option below to explore them further.
This could be used for home heating oil. Disclosing the total gallons remaining, cost per gallon, and the EPICcalculation will show in the "Result" field.
Similar to Oil, except calculated in total days and cost per day. EPIC will automatically calculate the amount in the "Result" field.
Sewer operates exactly the same as the Water type. Enter the total days and cost per day and EPIC will do the math and populate the product in the Result field.
This option works like a combination of the other fields. When you select "General" you have the option to enter a description of the charge, the quantity and then you can select the unit type. EPIC allows you to select Quarts, Gallons, Weeks, Days, Months, or Years. Enter the cost per unit and EPIC will calculate the cost in the "Result" field.
The date range has a few additional calculations that are performed by EPIC for you. Here, you will enter the Name of the bill to reimburse the seller. Enter the first day in the billing cycle and then the last day (normally the day of closing). Next, enter the total number of days in the billing period, this is the first day of the billing cycle to the last day of the cycle (28, 29, 30, or 31 usually). Finally, enter in the total amount of the bill. EPIC will calculate the per diem amount based on the Bill amount entered divided by the total number of days in the billing period field. EPIC will then calculate the total days between the from and to date and multiply that against the per diem rate to show the final calculation in the Result field.

P Box

Clicking the P Box will toggle between these two views to make it easier to visually identify items paid outside of closing.

P Box - Disbursement Entry

This new P Box allows for the entry of additional settlement charges. Enter the amount paid by the Borrower and/or Seller. The box defaults to disburse the funds; however, chose the dropdown between the check mark and the amount to indicate if the amount is included in the loan or deducted from the loan amount. In the Memo line, enter what the fee is for and the "To" line should include the party reciving the funds. The Disburse Total, Total Deduct, and Total Include fields automatically populate based on how the amounts are entered into EPIC.

P Box - Lines 801 & 802

In this calculator, enter the amount of the charge. In most cases, you will select the drop down and indicate that these amounts are deducted from the loan. In the Tofield,select the ellipses button to the far right of the field and then select Lender 1 (if working on the first lender).

G Box - Good Faith Estimate

Enter the GFE amount and choose one of the three options, Cannot Change, Can change 10%, or Can Change.

2015 Closing Disclosure

The 2015 Closing Disclosure is the most commonly use Settlement Statement. When selected, the settlement statement tab will appear as "Closing Disclosure".

From the GEN INFO tab, the settlement statement selection button will appear as "Switch to 2010 HUD", as shown below.

Remember, when changing from one settlement statement to another, any manually entered items on the settlement statement will be removed and must be re-entered.
There are several sections to the Closing Disclosure in EPIC. As with all settlement statements, EPIC is built so that the data entry mimics the way the Closing Disclosure appears to help eliminate the learning curve when swithcing to an electronic entry method. Many of the fields auto-populate based on informaiton previously entered. Being mindful of this when setting up the file will help reduce the amount of data entry points needed to complete the Closing Disclosure. Below are each section broken out, click the corresponding tab to explore the specific section.

Create Document - Closing Disclosure 2015

This section has several options. The first is Draft. Check the Draft box when printing a Draft Closing Disclosure. The Print option allows the selection of either a Full Closing Disclosure, Seller Only, or Borrower Only. The Seller Only option is not available on refinance files.
The orange button, "Create Document - Closing Disclosure 2015" initiates the creation of the CD and downloads it for review or sending to the clients/lender.
The option "Include Closing Disclosure in Disbursements" check box is selected by default. Unchecking this box will prevent any items entered on the CD from showing on the Disbursements screen. In most all applications, this option should remain selected.

The next option shown is the "Document Deliver Tracking". Click the "+" sign inside of the black triangle to expand this section.
The Status box can be changed between Estimate and Final.
The Loan Estimate Dilvered field is a date field, select the date that the estimate was delivered.
The next section below that is the tracking information. Select the CD Type that was printed, Borrower/Seller (remember the seller will not be an option on Refinance files). Then enter the name of the preparer and the date prepared in the next two fields under "Prepared By/On". Repeate for the "Signed By/On", "Delivered By/On", "Delivery Method", "Received By/On" and "Confirmation" fields. Once the "Closing Disclosure Type" field is changed to any one of the options available in the drop down, the next blank record will appear. EPIC will continue adding a new blank record each type a blank record's "Closing Disclosure Type" field is updated.
The final item shown is the "Print Signature Lines on Closing Disclosure", EPIC was updated to make this field permanently selected.

File / Loan Information

Most of the information in this field will populate based on the information previously entered into the GEN INFO Screen. The fields that do not pull information from the GEN INFO screen are:
Date Issued: This is the date that the Closing Disclosure was completed and issued.
Loan Term: This is the length of time that the loan is for. If less than 2 years, enter the number of months followed by "mo." to indicate months. If over 2 years, enter the number of full years followed by "years" and then the number of months followed by "mo."
Product: Use this field to describe the loan a little better. Use Negative Amortization, Interest Only, Step Payment, Balloon Payment, or Seasonal Payment and include any information about the intereste rate as well, like; Adjustable Rate, Step Rate, or Fixed Rate.
Loan Type: Check the box to indicate if the loan is convention, FHA, VA or other. A new field will appear, you can click the orange ellipses button and choose form the options available, or type directly into the new field.
MIC #: If available/required, enter the MIC (Mortgage Insurance Certificate) number.
?: The blank field with only the help prompt is reserved for any personal property value that will be included in the calculations.
Appraised Prop. Value: This defaults to the sales price; however, if the property appraises for more, this field can be overwritten to reflect that amount.

All other fields pull directly from the GEN INFO tab. The field names match the fields containing the information that should be udpated to be pulled into the Closing Disclosure.

Loan Terms

Enter the information provided by the lender in this section. The Loan Amount and Interest Rate fields will pull in directly from the GEN INFO tab from the Lender Policy Details section. The rest will need to be updated here.
Can this amount increase after closing?: This column allows you to indicate if the specific variable can change. Chose "No", "Yes", or "Some". If "Yes" is selected, EPIC will ask for additional information:
Click each drop down and select the appropriate response and enter the amounts/year as inidicated. If the field does not align with what is needed, click the "Custom text?" box and describe the change in 250 characters or less.
The other two fields "Interest Rate" and the "Principal & Interest" work similar to this.
The next field is the "Prepayment Penalty" and "Balloon Payment" fields. If the loan has these types of features, select "Yes" and enter the information to describe them.
The final field "Number of Columns" relates to the next section, "Projected Payments". Change this field from blank to a number between 1 and 4. This will change the number of available columns in the next section.

Projected Payments

This section starts off with the "Number of Columns" option from the prior section. Change this to add up to 4 columns in the "Projected Payments" section.
Fill out each section according to the lender instructions.
Principal & Interest: Enter the minimum and maximum the P&I portion of the payment will be for each year.
Mortgage Insurance: If required, enter the amount of the mortgage insurance applied to each monthly payment.
Esitmated Escrow: This is the amount held in the impound account on behalf of the borrower to cover the costs of property-related expenses such as Taxes, Homeowner Insurance, HOA dues, etc.
Estimated Total Payments: In the drop down, select how the estimate is calculated. Chose from Weekly, Annual, At maturity, Monthly, BiWeekly, Quarterly, etc. The field defaults to Monthly since it is the most commonly used.
Estimated Taxes, Insurance & Assessments: Enter the amount of the estimate and chose if this is calculated monthly or for the year.
This Estimate Incudes: Check all that apply. Selecting "Other" will open 6 more fields to enter different items that will reflect the amount necessary to pay out. Next, select if the item checked will be included inescrow.

Costs at Closing

All of the fields in this section auto-populate for you. The only field that can be edited is the LOAN ID # field; however, this information auto-fills from the information entered into the "Lender Policy Details" section of the GEN INFO tab.

Open/Close Loan Costs

Click the "+" sign inside of the black triangle to open the Loan Costs section. This contains "A. Origination Charges", "B. Services Borrower Did Not Shop For", "C. Services Borrower Did Shop For", and "D. Total Loan Costs (Borrower - Paid)".

A. Origination Charges

In this section, enter all of the origination charges shown on the lender's settlement statement or closing instructions. Start with entering the "Points", if any, on line A.01. Entering the points in the first field will ensure that the information auto-populates in the P Box calculator. Per CFPB guidelines, line A.01 is reserved for the percentage charged by the lender for the origination fee, not an amount for the interest rate buy-down.

Note that the Action drop-down in the P Box, for this section, automatically defaults to "Deduct from Loan", most other sections do not use the default function for the action button, instead assumes that the amounts will be disbursed.

Continue entering the information in this section based on the lender's instructions. If additional rows are needed, click the "Add Origination Charges" button to add 15 additional rows.

For these items that are generally deducted from the loan, a red asterisk "*" will appear to the right of the field.
To the left of the rows following A.01are two blue triangles. Use these to move a row up or down to re-order the entries.

B. Services Borrower Did Not Shop For

Enter all the charges for services proivded that the borrower did not shop for in this field. Use the P Box to enter the information. Remember to enter the amount for the each party, if any, select the drop down in the fee is being deducted or included in the loan and if not, ensure the "Disburse" field is checked.

"P" Box

The "P" Box in this section of the Closing Disclosure is the same for all lines from A.01 to C.20. The only exception to this is row A.01 where the amount is populated by the percentage entered into the field prior to clicking the P Box. The four orange buttons located at the top of the window act as navigation tools.

The first part identifies the section and then the line within that section that the P Box is currently open for. In this example, the P Box is editing for Section B. Service Borrower Did Not Shop For. Specifically Line 01. Always check to make sure that the correct P Box is open and another wasn't accidentally selected in error
Closes the current window inserting the data from the window into the specified row.
Clears out previous information. Clicking any of the other four buttons will save the cleared fields to the selected row (essentially deleting previously entered data).
Saves the data currently entered to the current row and goes to the previous row. Clicking this button on line A.01 will produce an error stating no previous rows.
Saves the data currently entered to the current row and progresses to the next row. When on the last row of the current view, it will advance to the next group. Clicking Next on row C.05 when no additional rows are showing will advance to section E, line 1 and on row C.20, it will present a blank row that will need to be clicked through to get to line E.01.
This section has 3 columns for the borrower and seller records. The first column is the amount of the fee. The second is the action column, Select the drop down and chose to "Include in Loan" or "Deduct from Loan". If you chose one of these options, the "Disburse?" column will automatically deselect itself. This is to avoid a double entry in the calculations. We do not want to deduct from or include the amount in the loan and disburse it.
Enter a brief description of the entered amount or chose from a few pre-selected options by clicking on the orange ellipses button to the right of the field. Below shows what may be available for you when the window is opened.
Don't worry if none of the options shown match your needs, close the window and type in the appropriate description. The pre-defined options will vary based on the section the P box was opened from.
This section is reserved for the Payee. Enter who will receive the funds in the To field. If this information is already available in EPIC from the GEN INFO tab. Click the orange ellipses button on the far right of the screen.
The above image above shows the default variables that can be selected. All of these are self-explanatory; however, it is important to point out some nuances in a couple of the options. "ATGF" refers to the underwriter, selecting this will pass all the information including address for Attorneys Title Guaranty Fund into the disbusrsement. The difference between the Settlement Agent and the Title company can vary depending on how the Settlement Agent information is completed on the GEN INFO tab. The settlement agent should reference the party the closed the transaction. In rare instances, another company may conduct the closing on the behalf of the Title Company, becoming the Settlement Agent; however the Title Company always references the party issuing the policy on behalf of the underwiter and cannot be updated changed by the user.
EPIC will automatically update these fields based on the information entered in the "Fee Entry" section. This cannot be changed manually.
This section should only be completd ifitems were Paid Outside of Closing "P.O.C." / Before Closing. If this is a lender credit, enter the amount into the "Other" row and check the "Lender credit?" box so that EPIC will know how to handle the amount.
This section was developed to assist the user in calculating split costs. In instances where teh seller agrees to share in the cost of an item, it can be entered here. First, make sure that the Borrower And Seller Fields at the top of the window do not have amounts populating, if they do, delete them first. When ready, check the box to show the two additional fields. Enter the full amount of the disbursement in the "Shared" box, and then enter the amount that the borrower will be responsible for in the "Borrowers Share" field. EPIC will calculate the Seller's Share and post the amounts to the fields at the top of the window.

C. Services Borrower Did Shop For

This field will automatically populate the lender title policy premium and lender endorsement premiums. Additionally, if a discount is applied to the lender policy causing the TRID calculation to vary from the actual amounts, this section will have the TRID credit.

The first button availabe in this section is the P Box. Use the instructions below to complete each section. Clicking the "Add Services Borrower Did Shop For" button will add more lines, up to line 19.

"P" Box

The "P" Box in this section of the Closing Disclosure is the same for all lines from A.01 to C.20. The only exception to this is row A.01 where the amount is populated by the percentage entered into the field prior to clicking the P Box. The four orange buttons located at the top of the window act as navigation tools.

The first part identifies the section and then the line within that section that the P Box is currently open for. In this example, the P Box is editing for Section B. Service Borrower Did Not Shop For. Specifically Line 01. Always check to make sure that the correct P Box is open and another wasn't accidentally selected in error
Closes the current window inserting the data from the window into the specified row.
Clears out previous information. Clicking any of the other four buttons will save the cleared fields to the selected row (essentially deleting previously entered data).
Saves the data currently entered to the current row and goes to the previous row. Clicking this button on line A.01 will produce an error stating no previous rows.
Saves the data currently entered to the current row and progresses to the next row. When on the last row of the current view, it will advance to the next group. Clicking Next on row C.05 when no additional rows are showing will advance to section E, line 1 and on row C.20, it will present a blank row that will need to be clicked through to get to line E.01.
This section has 3 columns for the borrower and seller records. The first column is the amount of the fee. The second is the action column, Select the drop down and chose to "Include in Loan" or "Deduct from Loan". If you chose one of these options, the "Disburse?" column will automatically deselect itself. This is to avoid a double entry in the calculations. We do not want to deduct from or include the amount in the loan and disburse it.
Enter a brief description of the entered amount or chose from a few pre-selected options by clicking on the orange ellipses button to the right of the field. Below shows what may be available for you when the window is opened.
Don't worry if none of the options shown match your needs, close the window and type in the appropriate description. The pre-defined options will vary based on the section the P box was opened from.
This section is reserved for the Payee. Enter who will receive the funds in the To field. If this information is already available in EPIC from the GEN INFO tab. Click the orange ellipses button on the far right of the screen.
The above image above shows the default variables that can be selected. All of these are self-explanatory; however, it is important to point out some nuances in a couple of the options. "ATGF" refers to the underwriter, selecting this will pass all the information including address for Attorneys Title Guaranty Fund into the disbusrsement. The difference between the Settlement Agent and the Title company can vary depending on how the Settlement Agent information is completed on the GEN INFO tab. The settlement agent should reference the party the closed the transaction. In rare instances, another company may conduct the closing on the behalf of the Title Company, becoming the Settlement Agent; however the Title Company always references the party issuing the policy on behalf of the underwiter and cannot be updated changed by the user.
EPIC will automatically update these fields based on the information entered in the "Fee Entry" section. This cannot be changed manually.
This section should only be completd ifitems were Paid Outside of Closing "P.O.C." / Before Closing. If this is a lender credit, enter the amount into the "Other" row and check the "Lender credit?" box so that EPIC will know how to handle the amount.
This section was developed to assist the user in calculating split costs. In instances where teh seller agrees to share in the cost of an item, it can be entered here. First, make sure that the Borrower And Seller Fields at the top of the window do not have amounts populating, if they do, delete them first. When ready, check the box to show the two additional fields. Enter the full amount of the disbursement in the "Shared" box, and then enter the amount that the borrower will be responsible for in the "Borrowers Share" field. EPIC will calculate the Seller's Share and post the amounts to the fields at the top of the window.

D. TOTAL LOAN COSTS (Borrower-Paid)

This section shows the cacluations of the total loan costs and is calculated by adding sections A, B, and C together. Below the gray bar, EPIC shows the calculations for both the "At Closing" and "Before Closing" amounts and the field inside of the gray bary sums both of those fields together.

These fields are not editable. Any information typed into the fields will be removed and replaced with the calculated amounts.

Open/Close Other Costs

Click the '+' sign in the black triangle to open the section.
Once expanded, the first option is "Disclose Other Costs on aseparate page?" click this box only if the costs need to be shown on a separate page; otherwise, thes amounts will appear in the Closing Disclosure.

E. Taxes and Other Government Fees

This section is used for all of the taxes and fees charged by the government. Line 01 will vary by state. Due to new recording fee structurs in Colorado, properties in this state will see the line appear as: 
There are several different boxes that appear in this section. The first is the "B" and "S" Boxes, then the "C" Box, and finally the "P" box. Click on the buttons below to explore each of them.

The last button shown in this section is the "Add Taxes and Other Government Fees". In the event that 5 lines are not enough, click this button to expand the section to 18 lines.

The "B" and "S" Boxes

The B and S Box indicate the responsible party for the specified fee.
S: indicates that the fee will be applied to the Seller side.
B: Indicates that the fee will be applied to the Borrower side.

In the example above, $43 will be applied to the Seller and $43 to the Borrower. EPIC will split out the fees for you, as shown below.

"P" Box

The "P" Box in this section of the Closing Disclosure is the same for all lines. The only exception to this is row 01 where the amounts are entered first into the fields before clicking the P Box (except for Colorado) as the amount fields are not editable.

In Colorado, click the C Box first and fill it out prior to jumping into the P Box.

The four orange buttons located at the top of the window act as navigation tools.

The first part identifies the section and then the line within that section that the P Box is currently open for. In this example, the P Box is editing for Section B. Service Borrower Did Not Shop For. Specifically Line 01. Always check to make sure that the correct P Box is open and another wasn't accidentally selected in error
Closes the current window inserting the data from the window into the specified row.
Clears out previous information. Clicking any of the other four buttons will save the cleared fields to the selected row (essentially deleting previously entered data).
Saves the data currently entered to the current row and goes to the previous row. Clicking this button on line A.01 will produce an error stating no previous rows.
Saves the data currently entered to the current row and progresses to the next row. When on the last row of the current view, it will advance to the next group. Clicking Next on row C.05 when no additional rows are showing will advance to section E, line 1 and on row C.20, it will present a blank row that will need to be clicked through to get to line E.01.
This section has 3 columns for the borrower and seller records. The first column is the amount of the fee. The second is the action column, Select the drop down and chose to "Include in Loan" or "Deduct from Loan". If you chose one of these options, the "Disburse?" column will automatically deselect itself. This is to avoid a double entry in the calculations. We do not want to deduct from or include the amount in the loan and disburse it.
Enter a brief description of the entered amount or chose from a few pre-selected options by clicking on the orange ellipses button to the right of the field. Below shows what may be available for you when the window is opened.
Don't worry if none of the options shown match your needs, close the window and type in the appropriate description. The pre-defined options will vary based on the section the P box was opened from.
This section is reserved for the Payee. Enter who will receive the funds in the To field. If this information is already available in EPIC from the GEN INFO tab. Click the orange ellipses button on the far right of the screen.
The above image above shows the default variables that can be selected. All of these are self-explanatory; however, it is important to point out some nuances in a couple of the options. "ATGF" refers to the underwriter, selecting this will pass all the information including address for Attorneys Title Guaranty Fund into the disbusrsement. The difference between the Settlement Agent and the Title company can vary depending on how the Settlement Agent information is completed on the GEN INFO tab. The settlement agent should reference the party the closed the transaction. In rare instances, another company may conduct the closing on the behalf of the Title Company, becoming the Settlement Agent; however the Title Company always references the party issuing the policy on behalf of the underwiter and cannot be updated changed by the user.
EPIC will automatically update these fields based on the information entered in the "Fee Entry" section. This cannot be changed manually.
This section should only be completd ifitems were Paid Outside of Closing "P.O.C." / Before Closing. If this is a lender credit, enter the amount into the "Other" row and check the "Lender credit?" box so that EPIC will know how to handle the amount.
This section was developed to assist the user in calculating split costs. In instances where teh seller agrees to share in the cost of an item, it can be entered here. First, make sure that the Borrower And Seller Fields at the top of the window do not have amounts populating, if they do, delete them first. When ready, check the box to show the two additional fields. Enter the full amount of the disbursement in the "Shared" box, and then enter the amount that the borrower will be responsible for in the "Borrowers Share" field. EPIC will calculate the Seller's Share and post the amounts to the fields at the top of the window.

"C" Box

In Colorado, the recording fees are calculated for you. When the C box is clicked, this window will appear. Enter the number of each document type and then click the Close button.

This screen was updated to show 1 Deed, 2 Mortgages, 3 Releases, and 2 Death Certificates. The recording fees for the Deed and Releases were updated to append to the Seller side. Below is how EPIC displayes the info.
The only update that needs to be made after this is to access the P Box and enter the memo and payee information.

Heading

This section is for any pre-paid amounts. Enter the information in this field as it is provided by the lender. To complete this section follow the below steps.

F.01-Homeowner's Insurance Premium & F.02-Mortgage Insurance Premium: In the first field, enter the number of months that will be collected at closing. Next, click the "P" box, fill in the amount to be collected and payee.

F.03-Prepaid Interest: If the Lender Policy Details section of the GEN INFO screen was completed with the interest rate, EPIC will automatically calculate the amount and enter it into the first field. Next, the first date field will populate with the disbursement date while the second field will populate to the first of the following month. Verify that this is how the lender has caluclated this as well. When ready to continue, click on the "P" box, verify that the amount will be disbursed, or deducted from the loan amount. Enter the party receiving the funds, change the payee type to lender and close the P Box window.

F.04-Property Taxes: The first field can be typed manually, or you can select from the presets by clicking on the ellipses button and selecting the appropriate option. Below are the current defaults.
After getting the type of tax entered, enter the number of months being collected and then click the "P" box to enter the remaining information as you did for the previous lines.

F.05: This line begins the manually entered prepaids. To start, enter the number of months being collected and the click the "P" box. You can skip the first field showing directly after "05" as it populates from the memo line and payee line in the "P" box.

To add 2 additional lines to this section, click the "Add Prepaids" button at the bottom of the section. EPIC allows upt to 7 rows in total.

It is important to keep in mind, this section should not contain any items that are kept in an Escrow/Impound account. Those are itemized in the next section.

G. Initial Escrow Payment at Closing

This section is reserved for funds collected on behalf of the borrower to be used for specified housing expenses, e.g., Property Taxes, Homeowner Insurance, Flood Insurance, HOA Dues and/or Special assessmenets, etc. Follow these steps to accurately complete these items.

G.01-Homeowner's Insurance: In the first field, enter the amount of the monthly contribution and then enter the number of months to be collected at closing. EPIC will do the math and place the product in the borrower collumn. Click the "P" Box and enter the memo informaiton, and payee. Remember to indicate if the funds are to be disbursed or deducted from the loan.

G.02-Mortgage Insurance: In the first field, enter the amount of the monthly contribution and then enter the number of months to be collected at closing. EPIC will do the math and place the product in the borrower collumn. Click the "P" Box and enter the memo informaiton, and payee. Remember to indicate if the funds are to be disbursed or deducted from the loan.

G.03-Property Taxes: In the first field, enter the amount of the monthly contribution and then enter the number of months to be collected at closing. EPIC will do the math and place the product in the borrower collumn. Click the "P" Box and enter the memo informaiton, and payee. Remember to indicate if the funds are to be disbursed or deducted from the loan.
G.04 through G.07: In these rows, skip the first field in the row as this is auto-populated based on the memo and payee information entered into the "P" box. In the second field, type in the monthly amount and then the number of months being collected in box 3.

G.08-Aggregate Adjustment: In many cases, the calculations, when split out for each individual item to be escrowed do not align with the calculation of all to account for the cushion amount. In cases where amounds wer over-collected, use the "P" box on this line to enter the amount of the adjustment.

Finally, to add 3 additional lines (G.07-a thorugh G.07-c), click the "Add Initial Escrow Payment at Closing" button.

H. Other

Many items will auto-pupulate in this section. If the GEN INFO screen was completed with Real Estate agent information and compensation amounts/percentages, it will appear in this section. Additionally, the Owner Policy Premium, Owner Policy Endorsement Premiums as well as the TRID difference credit.

In this section, entries added should be completed using the "P" box. This ensures that the information in the field to the left of the box is entered properly as well as the fees are apended at the same time.

If additional lines are needed, click the "Add Other" button to expand the section to 16 rows.

I. TOTAL OTHER COSTS (Borrower-Paid)

This section shows the total amount from the "Paid at closing" column as well as the "Paid Outside/Before Closing" column for sections E, F, G, and H. These fields are not editable. Anything typed into or changed in these fields will automatically revert back to the calculated state prior to the change.

As with all section, the field in the Gray header shows the sum of all columns for that section.

J. TOTAL CLOSING COSTS (Borrower-Paid)

This section contains the calculated information based on a few sections. First, the "Closing Costs Subtotals (D + I)" row shows the sum for all closing costs in seciton D and I for both the Borrower and Seller. The amount in the field within the header reflects only the amount paid by the borrower.
The second line "Lender Credits" allows for amounts to be added to the Settlement Statement to reflect any lender credits provided. Enter the amount as a negative in the Borrower field. If any of the credit amount is to reduce the closing costs to below legal limits, check the box "Includes Lender Credit?" and enter the amount of the credit that was provied specifically for this reason.
The last 2 rows cannot be edited, they are based on the premium split and show the amounts due to the title agent and underwriter based on the title insurance premiums.

Calculating Cash to Close

This section shows all of the amounts as entered into the Closing Disclosure. Use this to ensure that the calculations match that provided by the lender. The column "Loan Estimate" and "Did this change?" contain the fields that are editable in this section, only the fields in the first column should be updated with the original estimates. If amounts are entered in the "Loan Estimate" field, the corresponding field in the column "Did this change?" will automatically change based on the amount entered.
If the amount entered on the "Total Closing Costs (J)" row, differ from the calculated amount in the "Final" column, the "NO" will change to "YES". If an increase occurred and it was over the legal limit, check the box.
The next row to have a similar change is the "Down Payment/Funds from Borrower", if a difference is detected, check the appropriate field "Purchase Price Increased" or "Or Loan Amount Increased". Below is an image of this section with the fields "Did this change?" marked "YES" but only to for those rows that have additional items to complete.
Total Closing Costs (J): This row needs to be checked if the increase between the estimate and the final columns increased over legal limits. Check the box if so.

Down Payment/Funds from Borrower: This row needs to be selected if the "Purchase Price Increased" or the "Loan Amount Increased" that correlated with the difference in the down payment funds from the borrower between the two columns.

Deposit: Indicate if the borrower incrased or decreased the deposit amount between the two columns.

Funds for Borrower: In this row, indicate if the funds for the borrower increased or decreased.

Summaries of Transaction

Click the '+' sign inside of the black triangle to expand the "Summaries of Transactions".

There are two sections for the borrower and two corresonding sections for the seller, "K" & "M" and "L" & "N".

K. Due from Borrower at Closing

M. Due to Seller at Closing

The field in the gray banner shows the total amounts calculated from this section
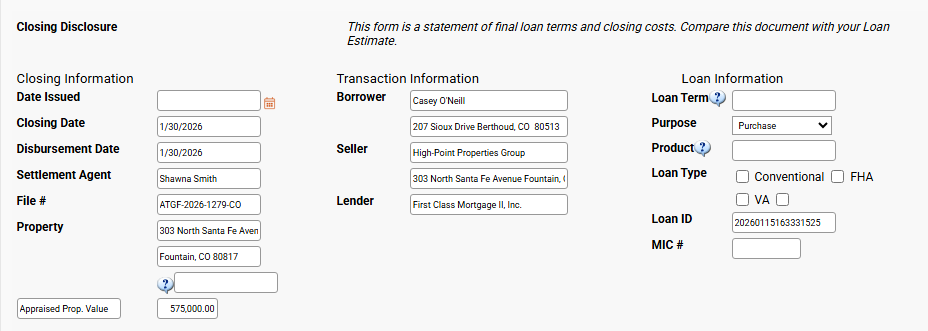
K.01 Sale Price of Property:
This is auto-populated with the sales price entered on the GEN INFO tab.
M.01 Sale Price of Property:
This is auto-populated with the sales price entered on the GEN INFO tab.
K.02 Sale Price of Any Personal Property Included in Sale:
There are two fields on this row, enter the discription to be included on the Closing Disclosure and then the amount.
M.02 Sale Price of Any Personal Property Included in Sale:
There are two fields on this row, enter the discription to be included on the Closing Disclosure and then the amount.
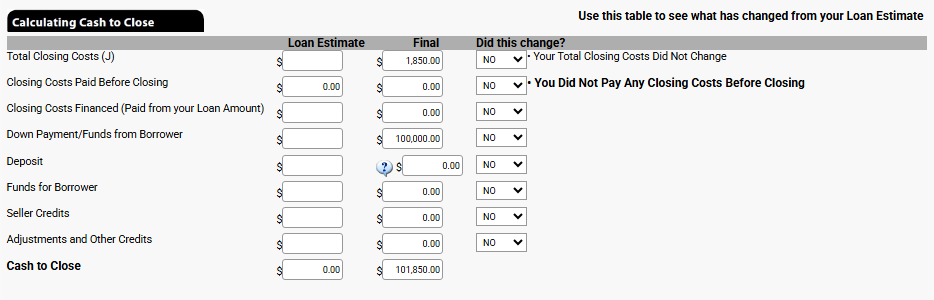
K.03 Closing Costs Paid at Closing (J):
This section automatically calculates the value based on the sum of items from section J. TOTAL CLOSING COSTS (Borrower-Paid).
M.03:
This field auto-populates based on the information entered in K.05.
K.04:
This field can be used to enter additional amounts that will be paid for the borrower at closing.
This is the only field by default, to add 5 more rows, click the "Add Due at Closing" button located under line K.07.
M.04:
This field auto-populates based on the informatin entered in K.06.
K.05:
This field is used to enter adjustments to be paid to the seller. Click the orange ellipses button for a pre-defined list that includes "Fuel Costs", "Repairs", "Sellers Escrow Assumption", Sellers Mortgage Insurance Assumption", and "Tenant Security Deposit". Amounts entered here will auto-fill in field M.03.
M.05:
This field auto-populates based on the information entered in K.07.
K.06:
This field is used to enter adjustments to be paid to the seller. Click the orange ellipses button for a pre-defined list that includes "Fuel Costs", "Repairs", "Sellers Escrow Assumption", Sellers Mortgage Insurance Assumption", and "Tenant Security Deposit". Amounts entered here will auto-fill in field M.04.
M.06:
This field auto-populates based on the information entered in K.07-a.

This line's corresponding line on the Borrower side only appears when the button "Add Due at Closing" is clicked.
K.07:
This field is used to enter adjustments to be paid to the seller. Click the orange ellipses button for a pre-defined list that includes "Fuel Costs", "Repairs", "Sellers Escrow Assumption", Sellers Mortgage Insurance Assumption", and "Tenant Security Deposit". Amounts entered here will auto-fill in field M.05.
This is the last field by default, to add 6 more rows, click the "Add Due at Closing" button.
M.07:
This field auto-populates based on the information entered in K.07-b.
K.07-a:
This field is used to enter adjustments to be paid to the seller. Click the orange ellipses button for a pre-defined list that includes "Fuel Costs", "Repairs", "Sellers Escrow Assumption", Sellers Mortgage Insurance Assumption", and "Tenant Security Deposit". Amounts entered here will auto-fill in field M.06.
M.08:
This field auto-populates based on the information entered in K.07-c.
K.07-b:
This field is used to enter adjustments to be paid to the seller. Click the orange ellipses button for a pre-defined list that includes "Fuel Costs", "Repairs", "Sellers Escrow Assumption", Sellers Mortgage Insurance Assumption", and "Tenant Security Deposit". Amounts entered here will auto-fill in field M.07.
M.08-a:
This field auto-populates based on the information entered in K.07-d.
K.07-c:
This field is used to enter adjustments to be paid to the seller. Click the orange ellipses button for a pre-defined list that includes "Fuel Costs", "Repairs", "Sellers Escrow Assumption", Sellers Mortgage Insurance Assumption", and "Tenant Security Deposit". Amounts entered here will auto-fill in field M.08.
M.08-b:
This field auto-populates based on the information entered in K.07-e.
K.07-d:
This field is used to enter adjustments to be paid to the seller. Click the orange ellipses button for a pre-defined list that includes "Fuel Costs", "Repairs", "Sellers Escrow Assumption", Sellers Mortgage Insurance Assumption", and "Tenant Security Deposit". Amounts entered here will auto-fill in field M.08-a.
M.08-c:
This field auto-populates based on the information entered in K.07-f.
K.07-e:
This field is used to enter adjustments to be paid to the seller. Click the orange ellipses button for a pre-defined list that includes "Fuel Costs", "Repairs", "Sellers Escrow Assumption", Sellers Mortgage Insurance Assumption", and "Tenant Security Deposit". Amounts entered here will auto-fill in field M.08-b.
K.07-f:
This field is used to enter adjustments to be paid to the seller. Click the orange ellipses button for a pre-defined list that includes "Fuel Costs", "Repairs", "Sellers Escrow Assumption", Sellers Mortgage Insurance Assumption", and "Tenant Security Deposit". Amounts entered here will auto-fill in field M.08-c.
Adjustments for Items Paid by Seller in Advance
K.08 City/town taxes:
This field is blank by default. Enter the date range first, and then click the "C" box.
The date fields will auto-populate with the dates entered prior to click the "C" box. Enter the total days in the billing period, check the statement to know for sure and then enter the total amount of the bill. EPIC will calculate the amount that will need to be reimbursed to the seller.

The result will auto-populate on line M.09.
M.09 City/Town taxes:
This field auto-fills based on the information entered into line K.08 City/town taxes.
K.09 County taxes:
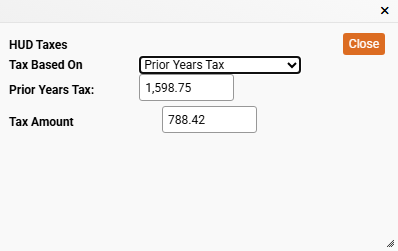
This field will have the date range already completed. Click the "C" Box and follow the prompts. The "C" box for this section has two more options available than just the date range shown above. This includes "Prior years taxes" and "Most Current Assessment". "Prior years taxes" works just like the date range, except the assumptmption is that there are 365 days in the period with no ability to change it. Below is the "Most Current Assessment" view
Use the tax bill to update these fields. Enter the assessed land value in the first field, the assessed value for the improvements, finally the mill levy. EPIC will then calculate the amount of the tax and create a per diem and then multiply it by the number of days in the date range.
M.10 County taxes:
This field auto-fills base don the information entered into line K.09 County taxes.
K.10 Assessments:
Complete this line exactly as instructed on line K.08 City/town taxes.
M. 11 Assessments:
This field auto-fills based on the information entered into line K.10 Assessments.
K.11 through K.15:
To complete these fields, enter the name of the fee in the first field of the line or click on the orange ellipses button to view a list of pre-selected options. Next Enter the date range before going to the "C" Box.
Complete the "C" Box exactly as instructed on row K.08 City/town taxes.
Information entered into these rows will auto-fill the corresponding lines on the seller side, M.12 through M.16.

If additional rows are needed, click the orange "Add Paid in Advance" button to increase up to K.18 on the borrower's side and M.19 on the seller's side.
M.12 through M.16 (or M.19 if expanded):
These fields are auto-filled based on the information entered into the corresponding lines starting at K.11 through K.15 (or to K.18 if expanded).

L. Paid Already by or on Behalf of Borrower at Closing & N. Due from Seller at Closing

Image of section L and N from EPIC application
This is some text inside of a div block.
L. Paid Already by or on Behalf of Borrower at Closing
N. Due from Seller at Closing
L.01 Deposit:
Enter the earnest monies paid into this field. When the cursor is moved to another field or the user tabs out, a message will appear asking, "Do you want to disclose the amount you entered on Line L1 ($###) on line N6($###)?" Clicking "OK" adds the information to line N.06, clicking "Cancel" will prevent EPIC from adding it. Clicking cancel nomrally indicates that the title company does not have the funds in trust and that they are held by the realtor.
N.01 Excess deposit:
L.02 Loan Amount:
This auto-populates from the GEN INFO screen with the amount of the loans for the file. In the box to the right of "Loan Amount" enter the name or names of lenders.
N.02 Closing Costs Paid at Closing (J):
This auto-populates from section J and will reflect the amount of closing costs paid by the seller.
L.03 Existing Loan(s) Assumed or Taken Subject to:
Enter the total amount for all loans being assumed by the buyer on this line. Note: Amounts entered here will auto-populate on line N.03.
N.03 Existing Loan(s) Assumed or Taken Subject to:
This field will auto-populate with the amount entered into line L.03.
L.04:
This field is used to enter amounts from other loans that will be used in the purchase of the property. Information entered here will populated on line N.06 as well, you will need to delete the information from the seller's side.
N.04:
This is used to calculate the payoff of the first mortgage (if present). Click the C box to open the calculator. Enter the name of the lender in the blank field, or click the ellipses button to select a lender that is already on your list of lenders (those where the lender was entered in a prior transaction). Click the "clear" button to delete all entries previously made in this window. Enter the loan number in the next field, and the current unpaid principal balance in the next. The good-through date in the "Statement Date" and then the date the funds will be wired. Enter the per diem amount in the next field. EPIC will calculate any interest that needs to be included in the payoff around if the funds are sent after the good-through date and display in the interest amount field. Enter any additional fees in the description, such as the Pre-payment penalty, then the amount of the fee. EPIC will add another row for any other potential fees to add. Finally, EPIC will calculate the total payoff amount to be sent and display in the Total Payoff Amount field.
L.04-a through L.04-c:
This field appears when the "Add Continuation Section" button is selected. Use this field when additional mortgages are used in the transaction to ensure each line is itemized. Items entered into these lines will appear on lines N.07, N.07-a, and N.07-b.
N.05:
Use this line to enter the payoff of a second mortgage (if present).
N.06:
Use this line to enter additional debits for the seller.
N.07:
This line will auto-populate from line L.04-a. Pay close attention to this as it may be necessary to delete these entries if the funds are not originating from the seller.
L.05:
This line is used to add any seller credits. Click the POC button to change to "Paid Outide of Closing".
L.06:
Use this line to enter additional credits. These lines do not auto-populate on the seller side.
N.07-a and N.07-b:
These lines will auto-populate from lines L.04-b and L.04-c. Pay close attention to this as it may be necessary to delete these entries if the funds are not originating from the seller.
L.07:
Use this line to enter additional credits. These lines do not auto-populate on the seller side.
N.08:
This line will populate based on the amounts entered into line L.05.
L.07-c through L.07-g:
Use these lines to enter additional credits. These lines will only populate if the button "Add Continuation Section" is selected.  These lines do not auto-populate on the seller side.
N.09 through N.13:
Use these lines to enter additional credits. These lines will only populate if the button "Add Continuation Section" is selected.  These lines do not auto-populate on the seller side.
L.08 through L.11
Use these lines for additional adjustments to be credited to the buyer.
N.13-a through N.12-r:
These lines only open when "Add Continuation Section" button is selected. Enter any additiona debits from the seller's proceeds here.
L.11-a through L.11-r:
This is some text inside of a div block.

Heading

This is some text inside of a div block.

Heading

This is some text inside of a div block.

Heading

This is some text inside of a div block.

Heading

This is some text inside of a div block.

Heading

This is some text inside of a div block.